Build an API explorer that gets images from Curiosity, a NASA Mars rover, such as this one!
This workshop should take about ~40 min.
Project Overview
PyCuriosity is an API explorer that gets Curiosity's images and image urls.
If you haven't worked with APIs before, read this resource. In short, Application Programming Interfaces(APIs for short) enable different computer applications to communicate, which is useful because we want images from Curiosity, which are stored on NASA's servers. To access them, we need a way to communicate with NASA's servers, which may seem daunting, but all we need to do is make a GET request to one of NASA's APIs, or request information from NASA's servers.
You can browse through NASA's APIs at api.nasa.gov, and sign up for an API key if you want. This isn't strictly required, as we'll see later on. The API we'll be using in this workshop is called the Mars Rover Photos API, an API for, well, Mars rover photos.
For simplicity, we won't create a GUI, but rather enable program execution using command line arguments(arguments that
can modify the flow of a program), using Python's builtin argparse, a powerful library to parse command line arguments.
After validating the command line arguments, we'll call the Mars Rover Photos API, using requests, and then write
the data to a text file, and potentially save the first image if we find any.
The Plan
Be sure to read the previous section if you're still confused as to what PyCuriosity is.
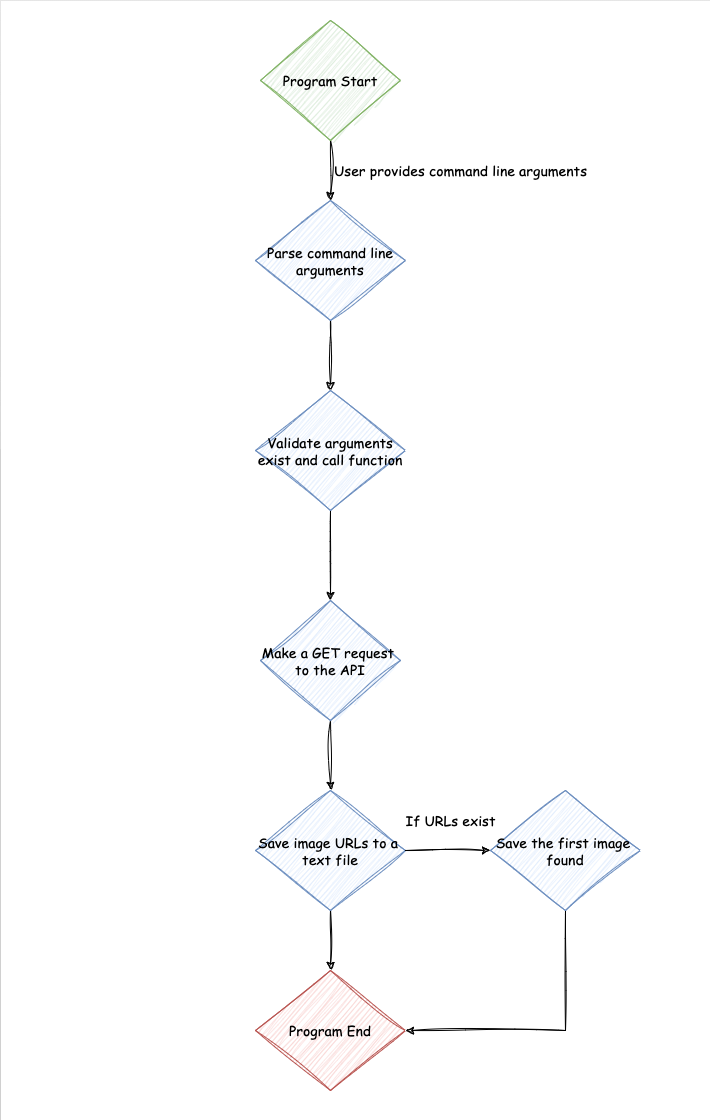
All great projects, big or small, always start with a plan. Planning out the project ahead of time saves confusion and provides a clear picture of the project, the resources to use, the skills to acquire.

This program flow was made using diagrams.net
Init
First, we need to look at the Mars Rover Photos API documentation, and it's a good idea to look it up on api.nasa.gov as well. We'll be querying by Earth date to keep things simple.
After going through the documentation, the following parameters are necessary to include in the request(take a look at the sample query)-
- An API key
- The Earth date(date Curiosity clicked the photos), which we need to get from the user
Also, we need a place to store the data we're requesting, so we also need a file name from the user.
Starting the project
Fork the starting repl. Let's see what we got-
- Right away you'll see a bunch of TODOs, incase you want to attempt the project solo
- Underneath the program/module docstring, you'll see a comment for imports. As mentioned earlier, we'll be using the
requestsmodule to make a GET request to the API andargparseto validate command line arguments. Add the following imports using the PEP-8 style guide
import argparse

import requests
- Next, you'll see the
main()andexplore_mars_rover_photos(file_name, date)functions, also with a bunch of TODOs. Notice howexplore_mars_rover_photos(file_name, date)'s signature includes the requirements we need. We'll useexplore_mars_rover_photos(file_name, date)to call the API andmain()to sort out the command line arguments. - Finally, we have this code snippet:
if __name__ == "__main__":
    main()
This makes the program modular, so the functions defined can be used/imported in other projects.
To access the Mars Rover Photos API, we need an API key(above). An API key is useful for authenticating data, so only trusted parties with the right API key can request information, which is very useful if the data costs money to collect, like weather data, population, etc. which might require paying for an API key. However, NASA's APIs are public and free, so we don't really need to signup and pay for an API key.
But, declaring an API key in a program is dangerous(recall it's not in explore_mars_rover_photos(file_name, date)'s signature),
as when the code is the visible to the public, everyone can copy-paste the API key and make requests, accessing sensitive data,
if you had to pay for the API key, and it may lead to security breaches or data leaks. Even though we aren't paying for an API key,
and the data we're accessing is completely public and free of cost, as is convention, we'll export the API key as an environment variable
in the CLI(terminal/command line), and access it using the builtin os module.
Setting up the os module
To get an environment variable using the os module, we'll use os.environ.get(). See the documentation
here
import argparse
import os

import requests
...
API_KEY = os.environ.get("API_KEY")
...
It's a good idea to get used to this, because this is standard practice when working with APIs.
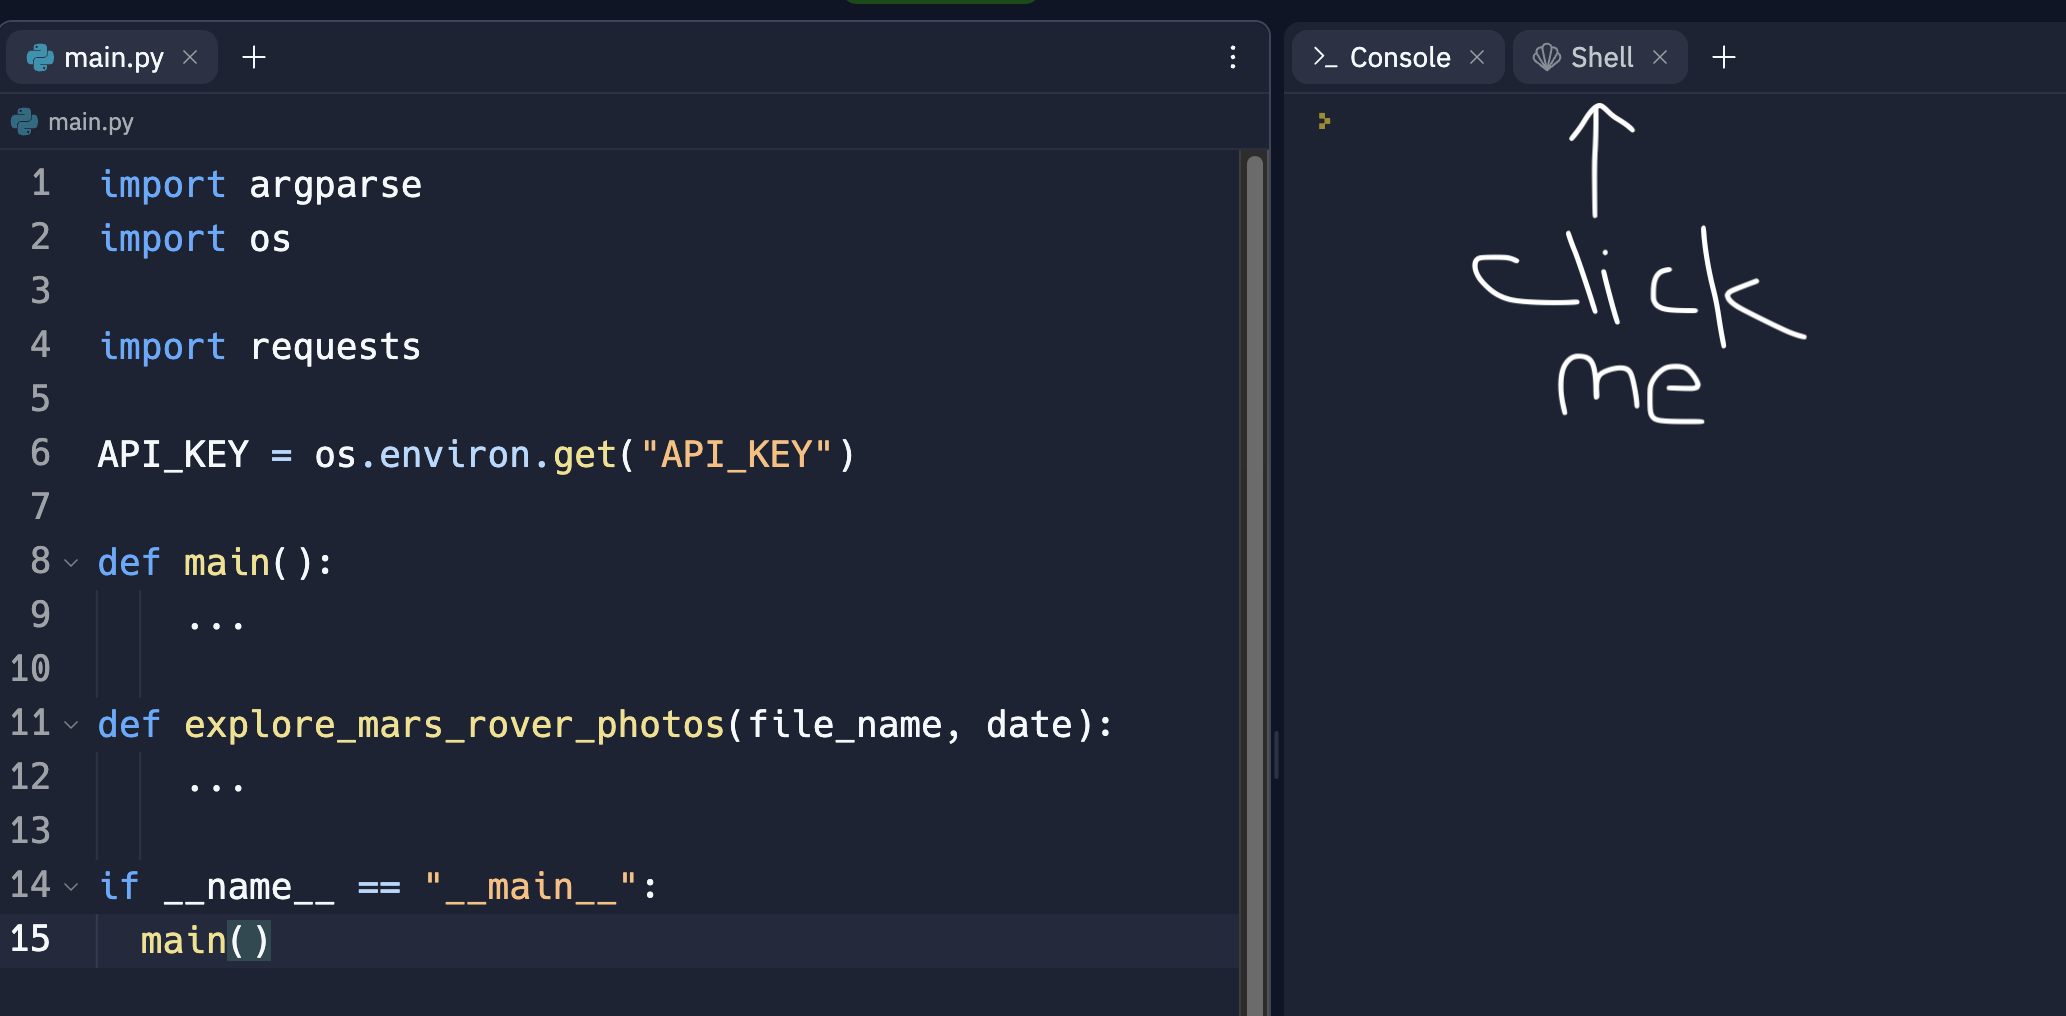
Next, we need to export the API key as an environment variable so the above code works. To do so, click on Shell, next to Console, on replit
If you signed up for an API key at api.nasa.gov, copy it to your clipboard, and type in the following command
export API_KEY=your_api_key
If you didn't sign up for an API key, NASA allows using a demo key, which can be used by
export API_KEY=DEMO_KEY
Programming main()
First, we need to check if the API key exists, and exit the program if the API key doesn't exist, as it's a requirement to call the API. This can be done using the builtin sys module, with the sys.exit() function. See documentation,
and add the sys module to your imports
...
import sys
...

def main():
    ...
    # Validate API key
    if not API_KEY:
        sys.exit("API Key not set")
    ...
The above code snippet uses sys.exit() to exit the program if the API_KEY doesn't exist.
Configuring argparse
Recall we also need to request a file name from the user to store the image URLs, and a date. Since we already
have the API key from an environment variable, we have to set up argparse to accept a date and file name.
Before we start, read the argparse documentation.
We want to run the program in the following way-
python project.py -m file_name date
The reason for creating the -m flag is so we can expand the project later on, for example with other APIs, and this approach makes it easy to add more command line arguments.
First, we need to sort out our imports, as per the PEP-8 style guide
import os
import sys
from argparse import ArgumentParser

import requests
Since we need to use the ArgumentParser class, we'll just import that instead of the entire module.
Then, we need to configure argparse, using the documentation-
import os
import sys
from argparse import ArgumentParser

import requests

def main():
    ...
    # Create argument parser and add optional command line arguments
    parser = ArgumentParser(description="PyCuriosity is an API explorer that can get Mars rover Curiosity's images")
    parser.add_argument("-m", "--mars", nargs=2, dest="mars", metavar=("file_name", "date"),
                        help="write the Mars rover image urls to a text file")

    # Parse arguments
    args = parser.parse_args()
The above code block first sets up the ArgumentParser as per the documentation(I've left out prog and
epilog for simplicity, feel free to add them, as well as modify existing keyword arguments as per the docs), and
adds an argument flag (-m for Mars), which accepts 2 parameters or nargs, stored in dest="mars", which we'll
use later on to validate the command line arguments, complete with metavar=("file_name", "date") for usage
messages. The documentation for parser.add_argument()
Finally, we need to validate at least one flag(-m or --mars) was given, and then call the explore_mars_rover_photos(file_name, date)
function with the command line arguments we just parsed-
def main():
    ...
    # Validate at least flag was given
    if len(sys.argv) == 1:
        parser.print_help()
        sys.exit()

    # Call relevant methods
    if args.mars is not None:
        file_name, date = args.mars
        explore_mars_rover_photos(file_name, date)
With the main() function implemented, we can now work on explore_mars_rover_photos(file_name, date)
Programming explore_mars_rover_photos(file_name, date)
First, we need to validate the command line arguments (date and file_name) before making a request-
...
import datetime as dt
import re
...

API_KEY = os.environ.get("API_KEY")
DATE = re.compile(r"(\d\d\d\d)-(\d\d)-(\d\d)")


def main():
    ...

def explore_mars_rover_photos(file_name, date):
    # Using regex, validates date
    if not re.search(DATE, date):
        print("Invalid date format, use YYYY-MM-DD.")
        return False
Recall this section from reading the documentation for the API-
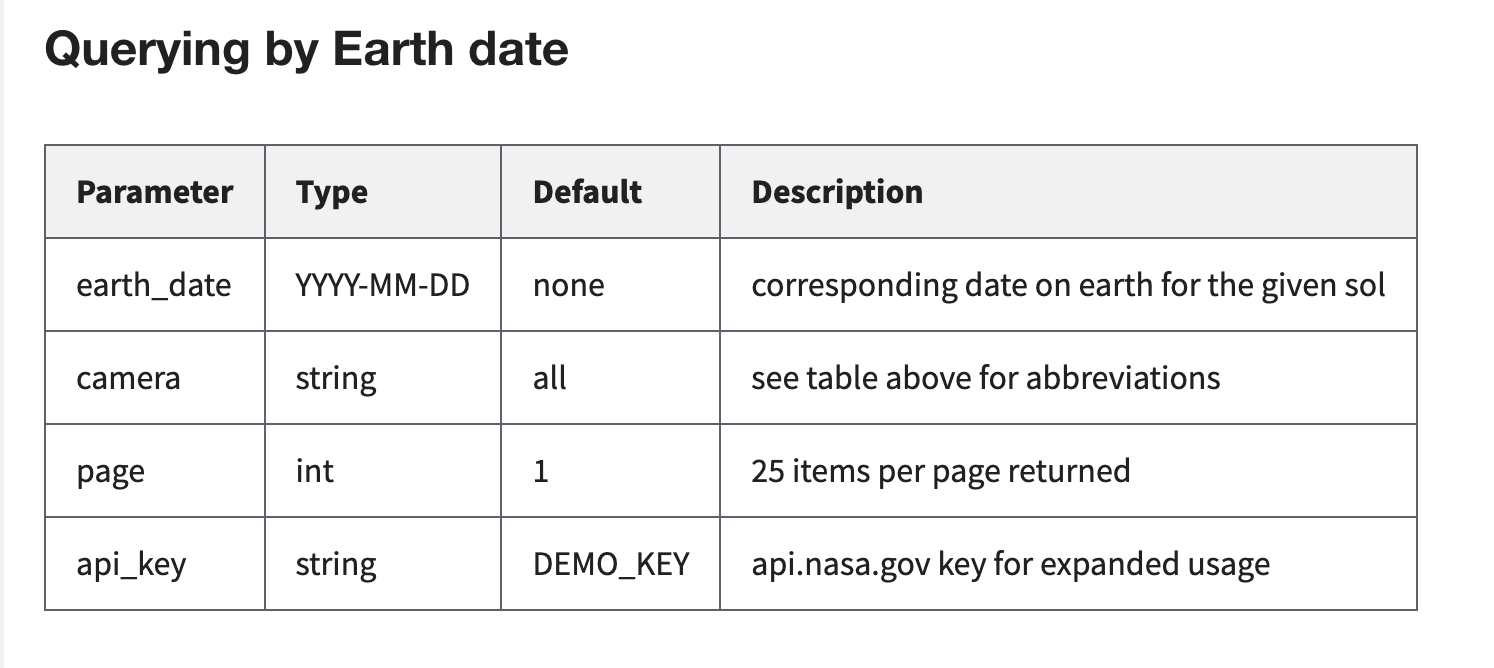
In particular, the date needs to be in the format YYYY-MM-DD. To validate this is the case, we use a regex from the
re module to verify the date is in this format. If unfamiliar with what a regex is, a regex essentially enables
searching for patterns in a string, and in this case we're trying to verify our date matches the pattern YYYY-MM-DD.
The documentation for the re module can be found here. Regexes are
very powerful tools, and are although challenging to compose for beginners, consider reading the documentation,
then check out this website (Select the flavour as Python before starting out) to get a better
idea for how regexes work.
Moving on, we need to check
- the file_name exists
- the file_name isn't " "
- the file_name is a .txt file
def explore_mars_rover_photos(file_name, date):
    ...
    # Check if file name is valid
    if not file_name or file_name == " " or not file_name.endswith(".txt"):
        print("Invalid file name, must contain characters and end with .txt .")
        return False
The above code block ensures the file_name is a valid text file. Now, we need to validate the date-
def explore_mars_rover_photos(file_name, date):
    ...
    date_year, date_month, date_day = date.split("-")
    try:
        date_dt = dt.datetime(year=int(date_year), month=int(date_month), day=int(date_day))
    except ValueError:
        print("Invalid date, use correct values for year, month, day")
        return False

    if date_dt > dt.datetime.today():
        print("Date must not be after today.")
        return False
Remember we still haven't completely verified the date yet! We've just checked using the DATE regex that the
date is in the correct format. The user could've entered 8912-23-95, which would match the YYYY-MM-DD pattern, but
isn't a valid date. This is where we split the year, month, and day using the split()
method, then using Python's builtin datetime module we convert it to a Python datetime object.
As per the datetime documentation, a ValueError will be raised
if the date isn't valid, so we don't need to setup if-else conditions for validating that the month is 1 <= month <= 12, and so on,
instead just catch the ValueError using a try, except, else
block.
We're finally ready to make a GET request!
...
TIMEOUT = 20

def main():
    ...

def explore_mars_rover_photos(file_name, date):
    ...
    # Sets up request parameters
    mars_endpoint = "https://api.nasa.gov/mars-photos/api/v1/rovers/curiosity/photos"
    params = {
        "earth_date": date,
        "api_key": API_KEY
    }

    print("Getting API response...")
    # Gets API response
    api_response = requests.get(mars_endpoint, params, timeout=TIMEOUT)
    rover_images = api_response.json()
The above code block first sets up the API endpoint, or the URL we use to make a GET request to NASA's servers. We
then set up the request header in the params dictionary, short for parameters, to provide the API parameters or
requirements (the API key and the date), then we finally make a GET request using requests.get(),
complete with the request header.
Notice the timeout keyword argument, that's incase anything bad/unexpected happens, given this is the Internet.
The timeout essentially means that the requests module will wait for 20 seconds for a response, which is quite a
long time, and then stop or timeout if it doesn't get any response, otherwise the program will just wait forever.
Then we convert the API response to JSON data, or essentially a massive Python dictionary to access the data.
Parsing the JSON data
To get a good idea for how the returned JSON data looks like, consider installing this Chrome extension, and then try out a sample query:
https://api.nasa.gov/mars-photos/api/v1/rovers/curiosity/photos?earth_date=2015-6-3&api_key=DEMO_KEY
This should give you a good feel for how the JSON data returned looks like, and what keys we need to access.
A sample for what the data looks like(this may vary if you're doing the workshop at a later date, in which case you'll need to figure out the appropriate keys)
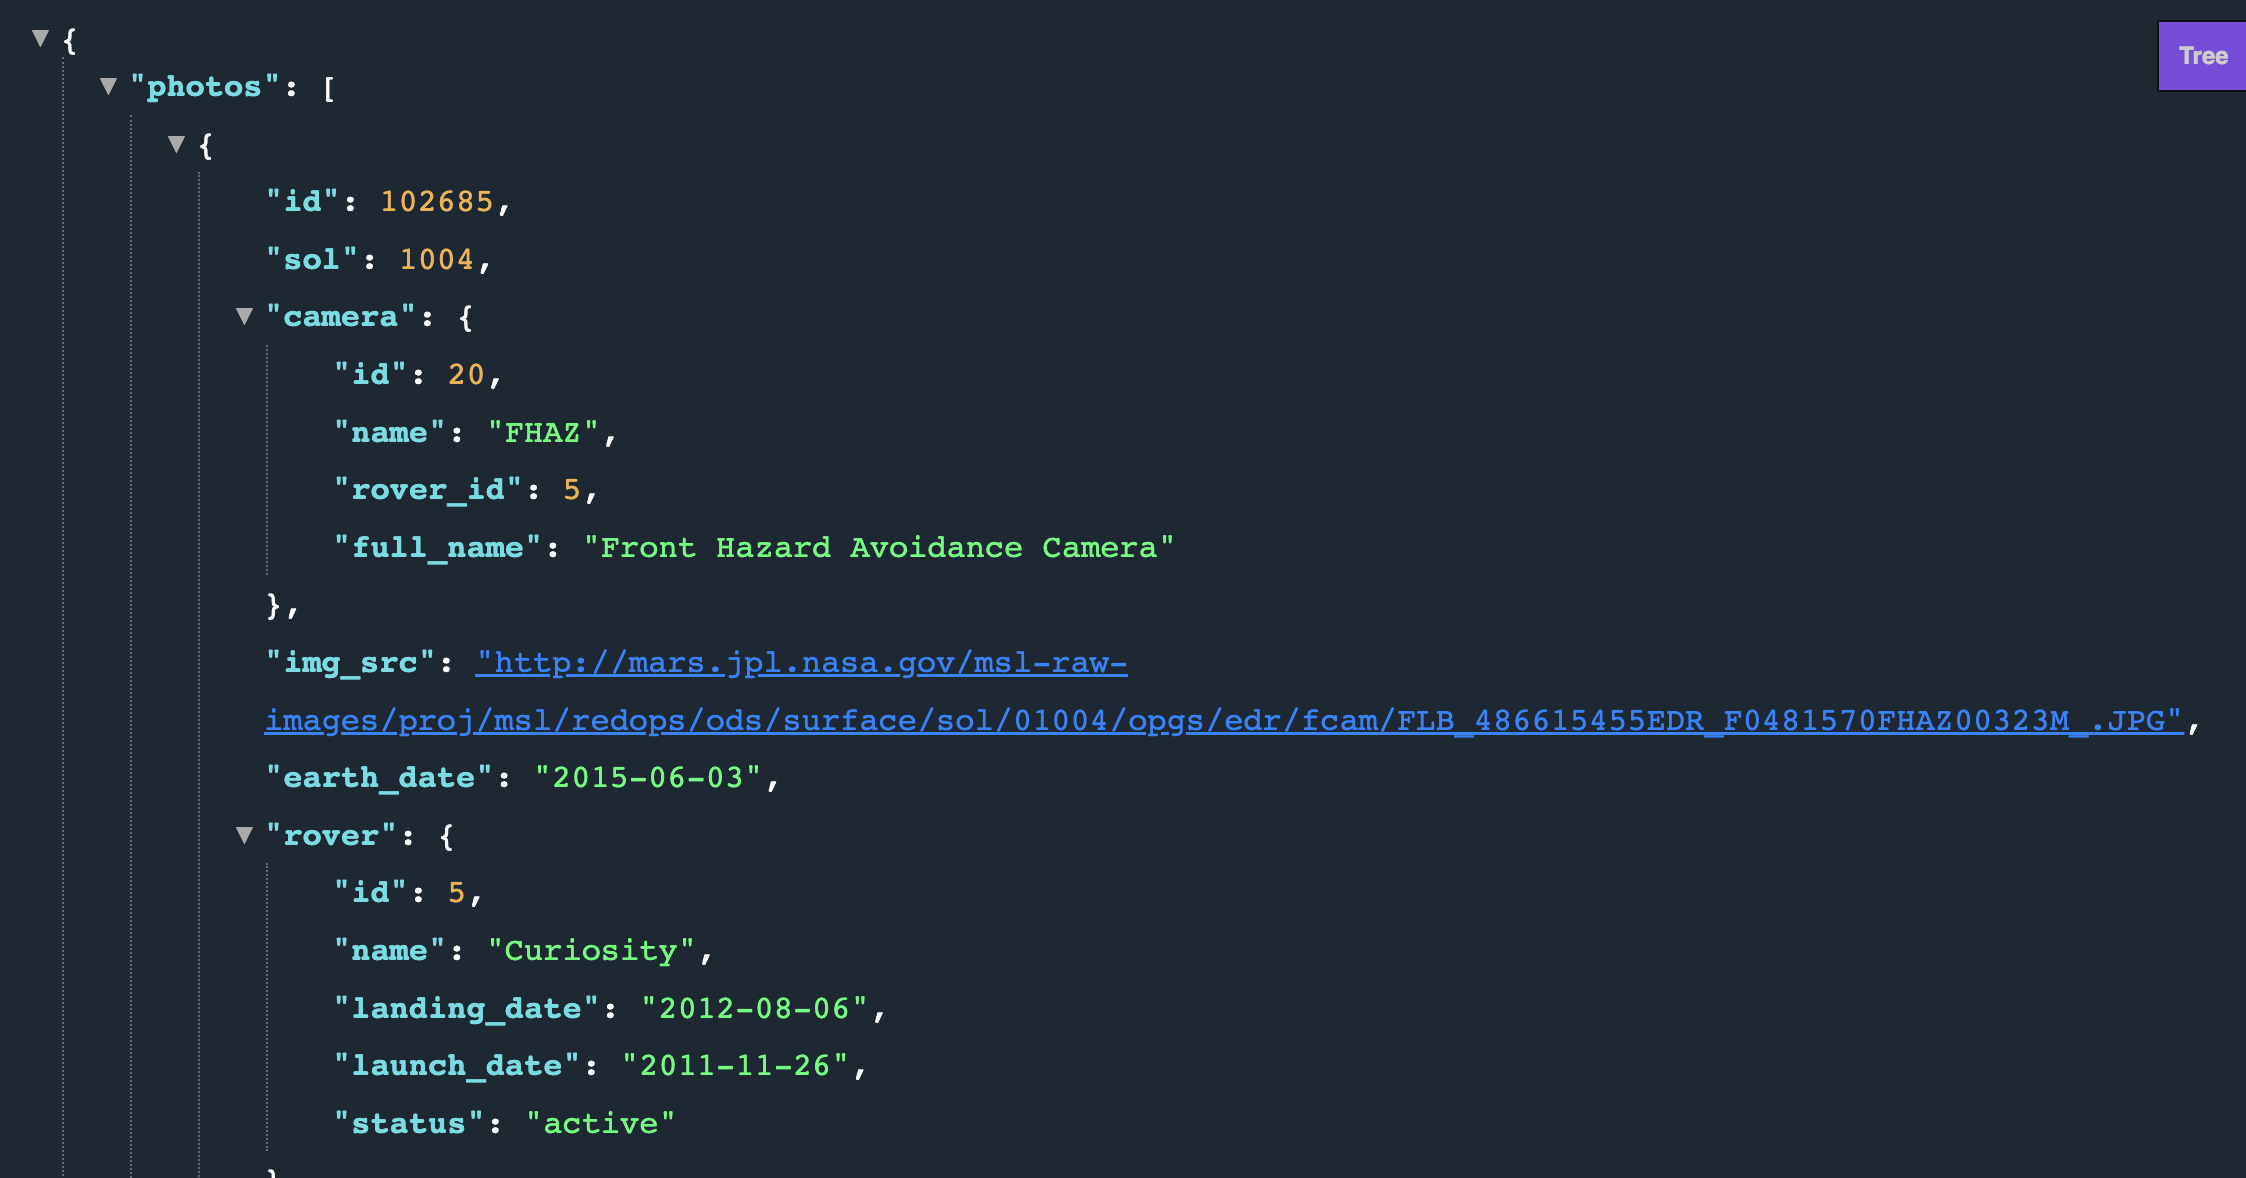
Now that we've got the API response and a good picture of what keys we need, we first need to check if any data was returned-
def explore_mars_rover_photos(file_name, date):
    ...
    try:
        photos = rover_images["photos"]
    except KeyError:
        print("Invalid date/API key.")
        return False
The above code block verifies if any data was returned, by trying to access the rover photos. If a KeyError was
thrown, which is caught by a try except else block, it's because no JSON data was sent over to parse.
Next, we also want to write the image URLs to the text file specified by the user.
def explore_mars_rover_photos(file_name, date):
    ...
    try:
        photos = rover_images["photos"]
    except KeyError:
        print("Invalid date/API key.")
        return False

    images = []
    # Writes url to file
    with open(file_name, "w", encoding="utf-8") as file:
        for photo in photos:
            image_url = photo['img_src']
            file.write(f"{image_url}\n")

            images.append(image_url)
The above code block just loops through each object found in the photos key and writes it to the text file, and also
appends it to a list, which will be useful later on.
Now, recall we want to try and save the first image. If photos is empty, we'll get an IndexError, i.e we need to
resolve that using a try except else block, and exits if the error was thrown.
def explore_mars_rover_photos(file_name, date):
    ...
    # Gets image if images were found
    try:
        file_extension = os.path.splitext(images[0])[-1].lower()
    except IndexError:
        sys.exit()
The above code block tries to get the file extension of the first image URL in images, and exits if an IndexError
was caused incase no photos was empty.
Next, we'll use one of the features of the requests module to save an image. At this stage in the program, since
the sys.exit() wasn't triggered earlier, an image URL exists. We need to provide that URL to the requests module,
and then save the image.
def explore_mars_rover_photos(file_name, date):
    # Gets image and saves it
    file_name = f"mars{file_extension}"
    image = requests.get(image_url, timeout=TIMEOUT)

    with open(file_name, 'wb', encoding=None) as file:
        file.write(image.content)

    # Return the API response status code
    return api_response.status_code
The above code snippet makes a GET request with the image url, and using the wb or write binary mode of Python's
open function, we write the image to a file, and finally return the API status code.
Last steps
To publish code, we need to document it, add comments and function annotations, and the necessary docstrings, according to the PEP-8 style guide. Go ahead and add the documentation as per the PEPs(below).
Docstrings: https://peps.python.org/pep-0257/
Function annotations: https://peps.python.org/pep-0484/
pylint
A linter is a great tool for formatting code. pylint is a popular linter used by the Python community, and another
linter called black, which is slightly less "noisy" or particular is also great if pylint feels a little overwhelming.
To use pylint, run the following commands-
pip install pylint
Activate pylint using-
pylint <file_name.py>
Follow pylint's suggestions to format code according to the PEP-8 style guide.
Finishing up
Link to the final source code-
Hacking
Here are some ways to expand on the project(repls linked below)-
- Add another API, in this example I've added the APOD API, but you could expand even further and potentially add all of NASA's APIs, and use the data to plot graphs, store images, etc.
- Integrate into a Flask app(replit), or a Django app(how to write a Django app) if you're super experienced, to showcase all those images we collected, instead of just saving the first one.
- Create a GUI with Python's builtin
tkintermodule, because GUIs look nicer and cleaner compared to a command line application, and are more user friendly if you want to share your project with the world.
Happy Hacking :)

